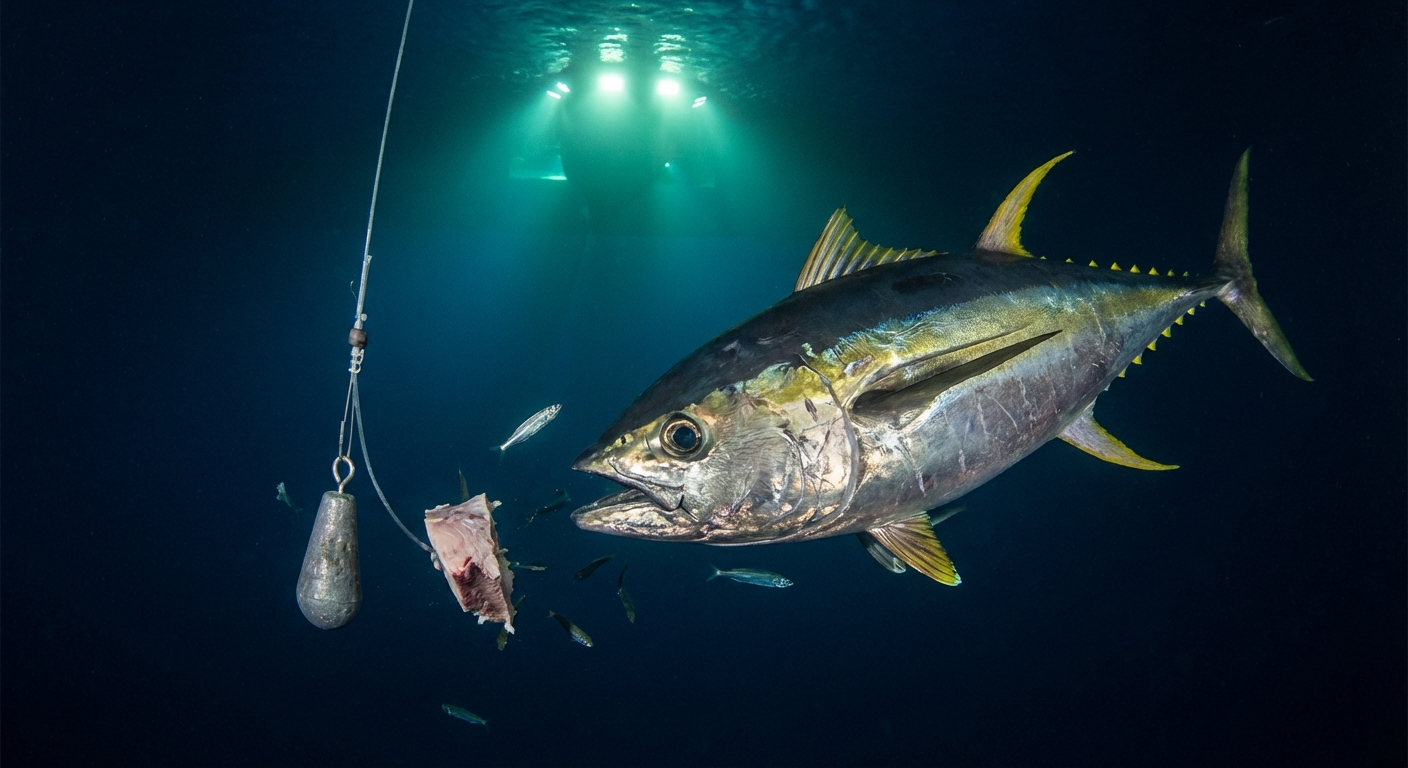
The hum of big diesels in the pre-dawn dark is the familiar anthem of the offshore game. Leaving the coast behind, Apalachicola fades into a memory as the compass settles on a heading bound for the deep blue. This is a different world from the bays and flats, a realm of immense scale and formidable predators. Out here, the target is Thunnus albacares, the yellowfin tuna, a species that embodies the raw power and challenge of the open Gulf of Mexico. This is not a casual pursuit. Success depends on preparation, a deep understanding of a dynamic environment, and the execution of precise tactics.
Forget the shallow water potholes and oyster bars. Our destination lies over the horizon, where the continental shelf gives way to true oceanic depths. The run from the Florida Panhandle is a commitment, often 70 to 100 miles or more. We are looking for structure, but not the kind you find on a coastal chart. The key features are deepwater oil and gas rigs, semi-submersible floaters, drillships, and major oceanographic features like the Loop Current and its associated eddies. These structures act as artificial reefs, creating entire ecosystems in the middle of nowhere. They attract and hold the entire food chain, from plankton and small baitfish to the apex predators we seek.
**Reading the Blue Water Canvas**
Before a line ever hits the water, the most critical work is done at the dock, analyzing data. Success in the bluewater game is a function of putting yourself in the right place at the right time. This means interpreting weather, sea state, and ocean currents.
Weather windows are paramount. A forecast of light to moderate southerly or westerly winds can be favorable, creating a gentle chop that seems to encourage a surface bite. Conversely, a hard east or north wind, especially after a frontal passage, can shut the bite down and make the long run punishing. Sea state is just as important. A long-period swell is manageable, but a tight, steep wind chop of three to four feet will make trolling effectively nearly impossible and wears down the crew.
The real art lies in reading satellite imagery. Sea surface temperature (SST) and chlorophyll charts are indispensable tools. Yellowfin are not randomly scattered across the Gulf; they are concentrated in areas with specific characteristics. Look for temperature breaks, those distinct lines where cooler and warmer water meet. These breaks act as invisible walls that concentrate bait. Similarly, chlorophyll charts show you where the most nutrient-rich, plankton-dense water is. Find a "blue to green" edge, and you have likely found the start of the food chain.
The single most significant factor is the Loop Current. This massive river of warm water pushes up from the Yucatan and sheds enormous eddies, some hundreds of miles across. The edges of these eddies are highways for pelagic species. A clockwise-spinning warm eddy meeting the ambient Gulf water creates a downwelling that pulls bait deep, while a counter-clockwise cold eddy creates an upwelling that pushes nutrients and bait toward the surface. Positioning your boat along one of these edges, especially where it collides with a rig or other structure, is the master tactic.
**Tactical Decision Making: Trolling vs. Live Bait**
Once you have arrived in a promising zone, the next decision is how to fish. The two primary methods are trolling and live baiting, each with its own set of triggers and tactical considerations.
Trolling is a search strategy. It allows you to cover vast amounts of water, looking for active fish. A typical spread for Gulf yellowfin involves six to eight rods, creating a pattern that covers different depths and distances from the boat.
A sample spread might include: - **Shotgun:** Farthest back, 200 to 300 yards. A small, dark-colored lure like a bullet head or a single naked ballyhoo. This lure often gets hit when fish are wary. - **Long Riggers:** Positioned 100 to 150 yards back. Medium-sized plastics, Islanders with ballyhoo, or smaller spreader bars. - **Short Riggers:** Run just outside the prop wash, perhaps 50 to 75 yards back. This is a prime spot for a larger lure, a daisy chain, or a heavier spreader bar to create maximum commotion. - **Flat Lines:** Clipped to the transom, these are your close-in positions, right in the clean water just outside the prop wash. Large ballyhoo on a skirt or a diving plug are excellent choices here.
Trolling speed is critical and must be adjusted to sea conditions. The goal is to keep the lures running true without tumbling or skipping out of the water. This usually means a speed of 6 to 8 knots. The key is to constantly watch the lures. Are they "swimming" naturally? If not, adjust speed or position.
Live baiting is the method of choice when fish are located but reluctant to strike trolled lures. This often happens around drillships or floaters where tuna are holding deep. The preferred baits are large hardtails (blue runners), flying fish, or even small bonito. Setting up a drift is key. Position the boat up-current from the structure or the marks on the sonar, allowing the boat and the baits to drift back over the target zone.
A standard live bait setup involves three lines. One flat line on the surface, allowing a frisky bait to swim freely. A second line is sent down 50 to 100 feet, often with a rubber band and a breakaway weight. The third line goes deep, 150 to 250 feet, targeting fish that are not visible on the surface. Fluorocarbon leaders are non-negotiable, typically 80 to 130 pound test, and at least 15 to 20 feet long. Hook choice is a matter of debate, but a high-quality 8/0 to 10/0 circle hook, matched to the size of the bait, is the standard for ensuring a solid hookup in the corner of the jaw, which is vital for a long fight.
**The Gear and the Fight**
This is no place for light tackle. Standard equipment consists of 50W and 80W class reels on stout, stand-up rods. These are spooled with at least 800 yards of 100 to 130 pound test braided line, topped with 100 to 200 yards of monofilament. The mono topshot provides crucial shock absorption and is more forgiving against the hull of the boat during the end game.
Sonar interpretation is a skill developed over time. You are looking for the characteristic red and orange arches of tuna, often suspended high in the water column. You will also learn to identify dense "beehives" of bait. Sometimes, the most subtle sign is the most important: a few scattered marks deep below a rig might be the big, cautious fish you are looking for.
When the strike comes, it is unmistakable. A flat line explodes in a shower of white water, or a deep-set rod simply doubles over as the reel begins to scream. The fight requires teamwork. The angler must be smooth and patient, using the drag system effectively. The captain’s job is to maneuver the boat, keeping the fish off the bow or stern corners and using the boat to help the angler plane the fish to the surface during the final stages.
**Common Errors to Avoid**
Many trips are undone by small, avoidable mistakes. Understanding these pitfalls can dramatically increase your odds of success. 1. **Old or Inadequate Leaders:** Leaders chafe, get nicked, and degrade in the sun. Always use fresh, high-quality fluorocarbon and check it obsessively for any imperfections. 2. **Incorrect Drag Settings:** Setting the drag by feel is a recipe for disaster. Use a scale. A common starting point is to set the strike drag at one-third of the line’s breaking strength. 3. **Ignoring the Sonar:** Do not just troll blindly. If you are marking fish deep, it is time to switch tactics to live baiting or chunking. Trust your electronics. 4. **Poor Bait Presentation:** A ballyhoo that is "washed out" and spinning is worthless. A live bait that is listless will be ignored. Take the time to rig and present your baits perfectly. 5. **Rushing the End Game:** The last 50 feet of the fight is where most fish are lost. The fish will make its final, desperate runs. Stay calm, keep consistent pressure, and have the gaffs ready and the crew briefed on their roles. Do not attempt a gaff shot until the fish is broadside and calm.
**Captain's call matters most** These tactics reflect one proven way to approach this fishery, but your charter captain makes the final call based on real-time conditions, boat setup, and what fish are doing that day. Different captains fish differently, and that is part of what makes good crews effective. Your captain's job is to put you on fish safely and efficiently, so treat this as a field guide, not a rigid script.
**Safety and Regulatory Reminders**
You are operating in a remote and unforgiving environment. Safety is not optional. - **EPIRB:** A properly registered Emergency Position Indicating Radio Beacon is the most important piece of safety gear on board. - **Life Raft:** A certified life raft is essential for trips this far offshore. - **Communications:** A satellite phone or other satellite communication device is a critical backup to a VHF radio. - **Float Plan:** Always file a detailed float plan with a reliable person on shore. Include your destination, expected return time, and boat information.
Finally, remember that yellowfin tuna are a highly migratory species managed under federal regulations. You must have the appropriate HMS (Highly Migratory Species) permit for your vessel. Bag limits, size limits, and reporting requirements can change. Always check the latest regulations from NOAA and the National Marine Fisheries Service before you leave the dock. The privilege of chasing these magnificent fish depends on responsible and sustainable angling practices. The blue water demands respect, and those who give it are often rewarded with the fish of a lifetime.